When constructing a gravel driveway, stability and longevity are critical factors that can make or break the investment. Enter the gravel driveway grid—a revolutionary ground stabilization method that ensures your gravel driveway remains firm, durable, and free from common issues like ruts, displacement, and erosion. In this comprehensive guide, we will break down the installation process for ground grids, specifically BaseCore™ geocell panels, to help you achieve a flawless, professional-quality gravel driveway that can withstand heavy traffic and harsh weather conditions. By following this step-by-step guide, you’ll be able to install your driveway efficiently and effectively, ensuring it stands the test of time with minimal maintenance.
Why Use a Gravel Driveway Grid?
Gravel driveway grids offer a multitude of benefits that go beyond simply keeping gravel in place. Here’s why installing a gravel driveway grid is a smart choice:
1. Enhanced Stability
The structure of geocell panels like BaseCore™ and PaveCore provides a solid foundation, dispersing weight evenly across the grid. This prevents shifting, sinking, and the formation of ruts over time, making your driveway much more stable under heavy loads.
2. Erosion Control
Gravel driveways are often susceptible to erosion, especially in areas with heavy rainfall or poor drainage. Geocell panels, with their honeycomb structure, hold the gravel in place while allowing water to pass through, mitigating erosion and eliminating the need for costly drainage systems.
3. Cost-Effective
Gravel driveway grids reduce the need for large quantities of gravel or other aggregate materials, cutting down both the initial cost and the frequency of future maintenance. With BaseCore™ geocell panels, you also save on labor costs due to their ease of installation.
4. Eco-Friendly
Using a ground grid system can be an eco-friendly choice, especially when you opt for sustainable infill options like vegetation. This allows for better integration with the natural environment, especially in areas prone to erosion.
Now that you understand the benefits, let’s dive into the step-by-step process for installing a gravel driveway grid.
Step-by-Step Guide to Installing a Gravel Driveway Grid
Step 1:
Clearing
The first step to a successful driveway grid installation is proper planning. Begin by assessing the area where you intend to install the driveway. Clear the area of any debris, rocks, or vegetation that could interfere with the installation process. If you have a current driveway, and the dimensions will be the same, then Measure and move to Step 2.
Measuring
Once the area is cleared, measure the dimensions of the driveway. BaseCore comes in standard US driveways sizes. It can be customized per exact measurements if required for larger projects, and can easily be trimmed where needed. Provide your measurements to the team at BaseCore and allow them to provide you with a customized quote that will fit your needs. Either provide a width and length or estimate of square footage if the width varies dramatically. The more information you can provide your BaseCore team, the better we can customize your driveway kit for you.
Step 2: Placement and Preparation
There are multiple methods of installing the BaseCore geocell ground grids. Sometimes it is determined by your geographical or topographical limitations. In other cases, it can be impacted by your sub-base soil makeup. Consulting with a local engineer or roadway specialist who can assess this is always recommended.
Grading
When preparing a driveway for proper drainage, two effective methods are commonly used: crowning and sloping. Each approach is designed to ensure water is directed away from the driveway, preventing pooling and potential damage.
Option 1: Crowning
Crowning involves shaping the driveway so that it is higher in the center and slopes down gently toward the edges. This method allows water to flow off both sides of the driveway, reducing the risk of erosion and water damage. The crown is typically created with a slight rise in the middle, usually around 2-3% of the total driveway width, depending on the specific conditions and the amount of rainfall in the area. Crowning is particularly effective for driveways that are flat or in areas with moderate rainfall, as it disperses water evenly.
Option 2: Sloping
Sloping, also known as grading, is another method where the entire driveway surface is angled in one direction, either to the left, right, or forward, depending on the surrounding landscape. This method is ideal for driveways on a hill or incline, where a natural slope already exists. The slope should be steep enough to allow water to flow off the driveway but not so steep that it causes erosion. Typically, a slope of about 1-2% is recommended to ensure adequate drainage without causing water runoff issues on adjacent properties.
Placement
When installing gravel grids or geocells for a driveway, choosing the right installation method is crucial for long-term stability and performance. Two primary options are available: placing the grids directly on grade or excavating the area and placing them at grade, each with distinct advantages and considerations.
Option 1: Placing Driveway Gravel Grids On Grade
Installing gravel grids or geocells directly on grade involves placing the grids on the existing ground surface without significant excavation. This method is quicker and less labor-intensive since it doesn’t require extensive digging or soil removal. It is also more cost-effective due to reduced excavation and preparation time. However, placing the grids on grade may not provide as stable a base, especially if the underlying soil is uneven or prone to shifting. In such cases, the gravel grids might not settle evenly, potentially leading to uneven wear and reduced effectiveness in stabilizing the driveway surface over time.
Option 2: Excavating and Placing Gravel Grids at Grade
The second approach involves excavating the driveway area to create a level surface at the desired grade, then placing the gravel grids within the excavated space. This method provides a more stable and secure base, as the excavation allows for the installation of a sub-base layer, such as compacted gravel or sand, before laying the grids. This additional preparation enhances the durability and longevity of the driveway by ensuring that the grids remain level and securely in place. The downside of this method is that it is more time-consuming and costly due to the need for excavation and additional materials. However, the investment in a properly prepared base can lead to a longer-lasting and more resilient driveway.
Ground Preparation
Once you’ve decided on your grading method—whether crowning or sloping—the next step is to prepare the ground for installing the BaseCore geocells. Proper ground preparation ensures that your driveway will be stable, durable, and well-drained. There are two main approaches to prepping the ground before installing the geocells: adding a sub-base layer of drainage rock or simply compacting the existing soil.
Option 1: Adding a Sub-Base Layer of Drainage Rock
In this method, a sub-base layer of drainage rock, such as ¾” clean crushed stone or angular gravel, is added before the geocells are laid. This layer is then rolled and compacted using a roller or plate compactor. The primary advantage of this approach is enhanced drainage and stability. The drainage rock helps to channel water away from the driveway, reducing the risk of water pooling and erosion beneath the surface. This method is particularly beneficial in areas with heavy rainfall, clay soils, or high groundwater levels, where proper drainage is critical to prevent water-related issues. The sub-base also provides a more solid and stable foundation, which can extend the lifespan of the driveway. However, this option involves additional cost and labor for the purchase, placement, and compaction of the drainage rock.
Option 2: Rolling and Compacting the Existing Soil
Alternatively, if the existing soil is stable and well-drained, you can opt to roll and compact it directly before installing the geocells. This method is quicker and more cost-effective, as it skips the step of adding a drainage rock layer. It is suitable for areas with well-drained sandy or gravelly soils, where the natural soil structure already provides adequate drainage. However, the absence of a sub-base layer may reduce the driveway’s ability to manage water effectively, especially in regions with heavy rain or poor soil conditions. Without the additional drainage rock, there’s a higher risk of water retention, which could lead to soft spots or uneven settling over time.
In summary, adding a drainage rock sub-base is ideal for ensuring long-term stability and effective drainage, especially in challenging soil conditions, while simply compacting the existing soil can be a viable option for areas with naturally well-drained soils. The choice depends on your local soil conditions, climate, and budget.
Step 3: Installing Geotextile
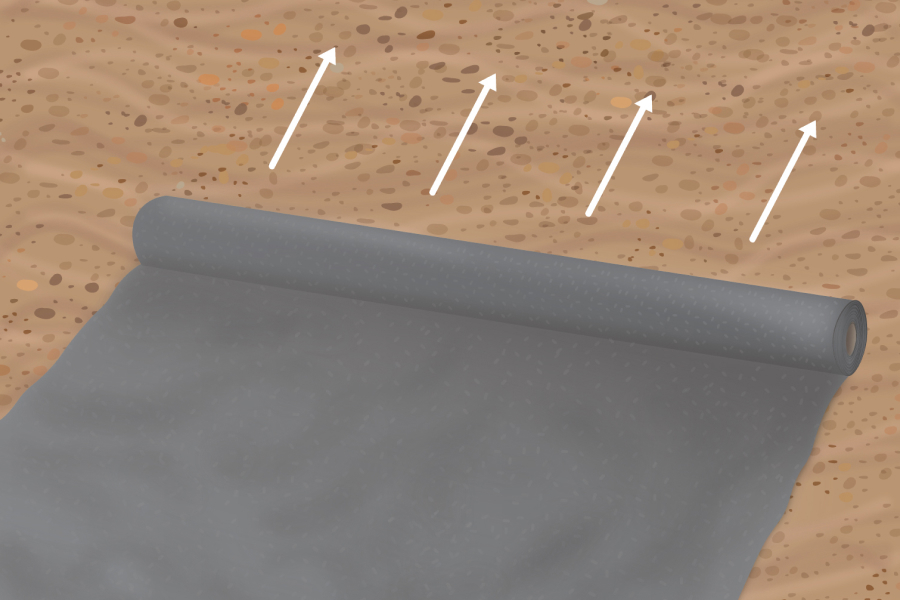
Before installing the geocells, it’s essential to lay down a high-quality geotextile fabric to enhance the stability and longevity of your driveway. The BaseCore commercial-grade non-woven geotextile is a thick, permeable fabric specifically designed to support the heavy weight loads of vehicles while preventing aggregates from punching through the fabric. This durable material serves multiple purposes, making it a critical component of your driveway installation.
The geotextile fabric effectively filters water, allowing for proper drainage while preventing soil erosion. It also acts as a barrier against weed growth, reducing the maintenance required to keep your driveway clean and clear. Most importantly, the geotextile stabilizes the fill material that will be placed inside the gravel grids. By separating the sub-base from the fill material, it ensures that the aggregates remain evenly distributed within the grids, providing a stable and resilient surface that can withstand the pressure of regular vehicle traffic.
Installing the geotextile is straightforward: simply roll out the fabric over the prepared ground, ensuring that it covers the entire surface area where the geocells will be placed. Our geotextile fabrics come in convenient 39″ rolls, 12.5 feet rolls (ideal for 12′ width driveways) and 15′ wide rolls (ideal for 14′ wide driveways). If seems are needed, overlap the edges by at least 6 inches to prevent any gaps where soil could infiltrate. This step is crucial for creating a solid foundation that will support the gravel grids and ultimately contribute to the overall durability and performance of your driveway.
Step 4: Selecting and Installing the BaseCore™ Geocell Panels
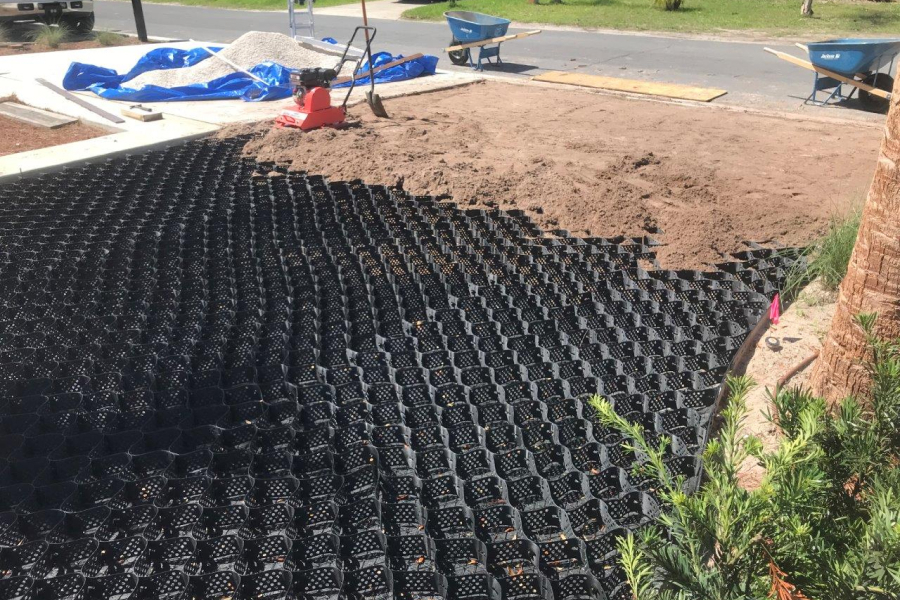
After the geotextile is securely in place, the next step is to install the geocells, which will form the foundation of your stabilized gravel driveway. Begin by placing the geocells on top of the geotextile fabric, ensuring they align with the layout of your driveway.
To expand the geocells, start at one end and use stakes to hold that end in place. Then, grab the opposite end and gently shake the geocells like a bed sheet to expand them fully. This technique ensures the cells open evenly and are ready to be filled with aggregate. Once expanded, attach additional panels of geocells using BaseClips at every intersection of each cell. These clips secure the panels together, creating a seamless and stable grid system across your driveway. For driveways, we recommend using BaseCore HD geocells, which are designed for heavy traffic and can support significant weight loads. However, for areas with lighter traffic, the standard BaseCore 4″ geocells may be sufficient.
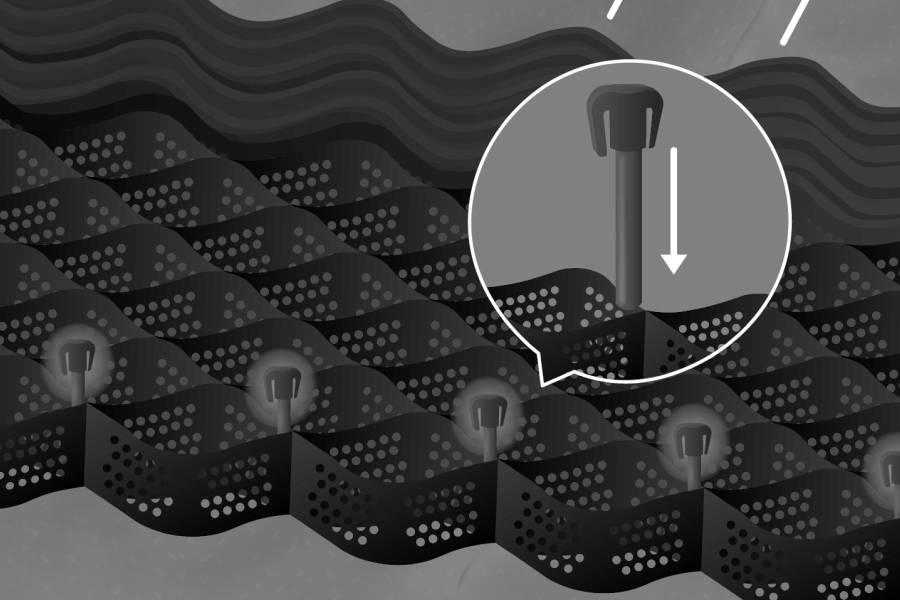
On steep slopes or edges, additional stabilization is needed. Use 1/2″ rebar stakes to secure the edges of the geocells, placing them every 2-3 feet. To prevent any potential tire damage, ensure the rebar stakes are capped with BaseCaps. This method is significantly stronger and more durable than using 3/8″ J-hooks, which often leave exposed rebar above the driveway surface. By using rebar stakes with caps, you ensure a clean, safe, and professional-looking finish that can withstand heavy weight loads and last for decades.
This installation process not only provides a robust and durable driveway surface but also ensures the geocells remain securely in place, delivering long-lasting performance under varying conditions.
Step 5: Filling the Cells with Infill
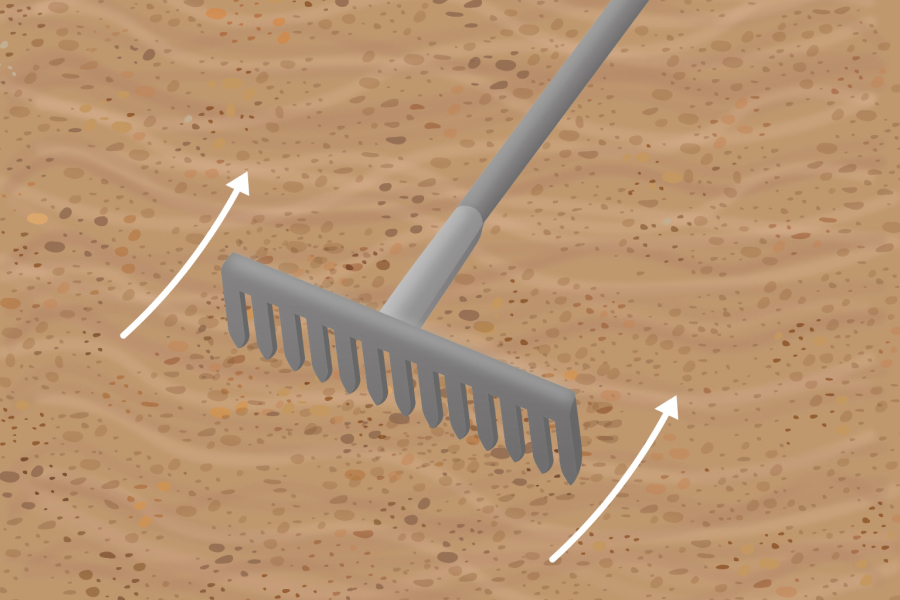
Once the geocells are securely in place, it’s time to fill them with the appropriate aggregate. Using a skid steer or front loader, start at one end of the driveway and begin dumping the aggregate into the cells. Be sure to dump the material from a low height, just slightly above the tops of the geocells, to avoid displacement or shifting of the grids. The aggregate you use should range from #57 stone to 1/4″ minus. This type of aggregate contains about 15% fines, which helps it to compact well within the cells.
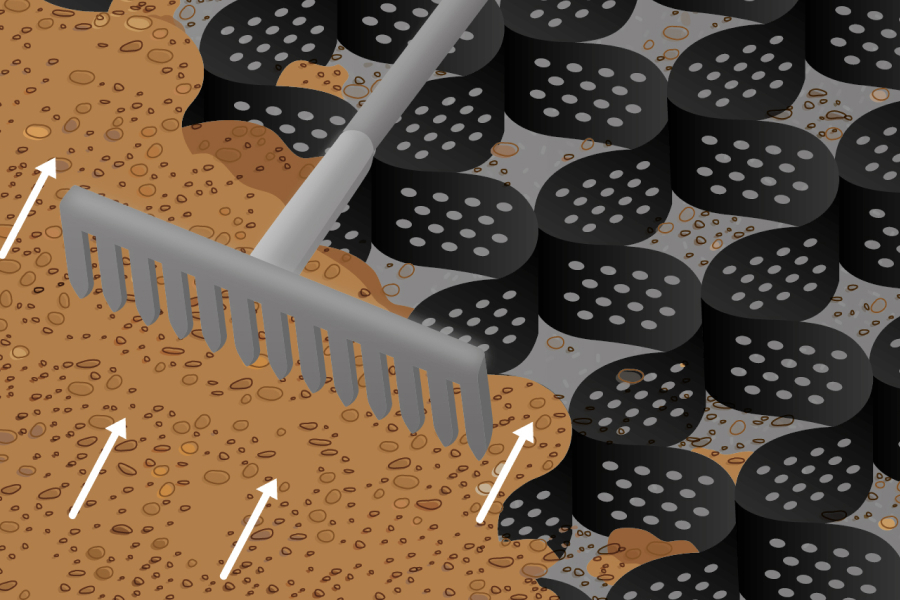
As you fill the cells, ensure the aggregate covers the tops of the geocells completely. After covering the cells, you can drive the skid steer or front loader on top of the filled area to push any remaining material into the adjacent cells as you move up the driveway. This process allows for even distribution and filling of the grid. The edges of the driveway may need some additional attention, and you can rake in the aggregate by hand to ensure full coverage and a clean finish.
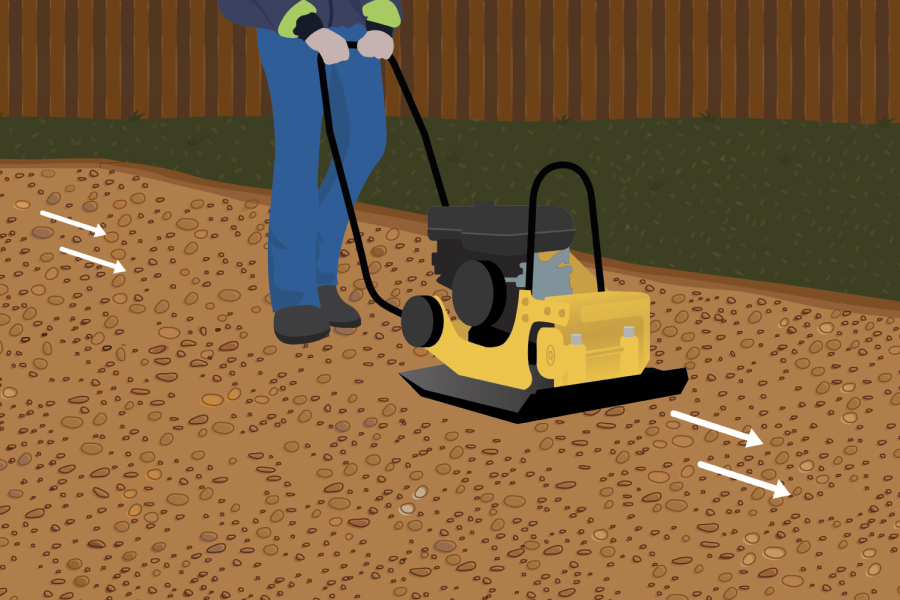
Once all the cells are filled, ensure that there is an additional 1.5-2 inches of loose aggregate on top of the cells. This loose fill will provide extra cushioning and ensure that the geocells are completely covered. The next step is to saturate the filled cells, ideally using a water truck. This helps to settle the aggregate and start the compaction process. After the area is thoroughly saturated, compact the aggregate using a 1-ton roller. This final compaction step is crucial to ensuring the aggregate is tightly packed within the cells, creating a durable and stable surface that will support heavy loads for years to come.
Step 6: Final Maintenance Tips
A geocell driveway, once properly installed, requires minimal maintenance compared to traditional driveways, but some care is necessary to ensure its longevity and optimal performance. Regular maintenance helps prevent issues like surface wear, erosion, or the displacement of aggregate over time.
Regular Inspection and Aggregate Top-Up
Periodically inspecting the driveway is key to identifying any areas where the aggregate might have settled or washed away, particularly after heavy rain or intense traffic. If you notice any low spots or exposed geocells, you should top up these areas with additional aggregate. This can be easily done by spreading the material with a rake and then compacting it lightly to maintain a smooth surface. Ensuring the surface remains evenly covered is crucial to protecting the underlying geocells and maintaining the structural integrity of the driveway.
Weeding and Debris Removal
While the geotextile fabric installed beneath the geocells inhibits most weed growth, some weeds may still appear on the surface, especially around the edges. Regularly removing these weeds by hand or with a non-toxic weed killer will help keep the driveway looking clean and prevent root systems from destabilizing the aggregate. Additionally, clearing the driveway of debris such as leaves, branches, or mud will prevent organic material from breaking down and potentially clogging the spaces between the aggregate, which could reduce drainage efficiency.
Regrading for Slope and Crown Maintenance
Over time, natural settling or heavy use may alter the slope or crown of the driveway, affecting water drainage. If you notice water pooling on the surface, it may be necessary to regrade sections of the driveway. This can involve adding more aggregate, redistributing the existing material, and compacting it to restore the original grade and drainage pattern.
Snow Removal
In colder climates, snow removal is another consideration. Using a snow blower or a plow with a rubber blade is recommended to avoid damaging the surface of the geocell driveway. Metal blades should be avoided as they can scrape away the aggregate and expose the geocells, leading to potential damage.
BaseCore™: Your Ideal Gravel Driveway Grid Solution
At BaseCore™, we understand the importance of a strong foundation, especially when it comes to your driveway. That’s why we’ve designed our geocell products to offer unparalleled stability, ease of installation, and long-term durability.
Why Choose BaseCore™ Geocell Products?
1. Superior Durability: BaseCore™ geocell panels are made with high-density polyethylene (HDPE), ensuring they are strong enough to withstand even the most intense weight and pressure. Whether you’re installing a residential driveway or a commercial roadway, BaseCore™ has you covered.
2. Easy Installation: BaseCore™ geocell panels are designed to be installed without specialized equipment, meaning you save both time and money on installation. Our collapsible, lightweight panels are easy to transport and customize to your project’s exact needs.
3. Permeability and Drainage: The perforated design of BaseCore™ panels allows water to pass through, eliminating the need for complex drainage systems and ensuring your driveway remains free of erosion and puddles.
4. Versatile Applications: Whether you need a foundation for driveways, roadways, parking lots, or erosion control, BaseCore™ products can be adapted to suit a variety of project requirements.
5. Proven Performance: Trusted across various industries—from construction to agriculture and erosion control—BaseCore™ geocell products deliver proven results, making them the go-to choice for reliable ground stabilization.
6. Custom Solutions: Have specific project requirements? Our engineering support team is ready to create custom geocell sizes and strengths tailored to your unique needs. We’ll work with you to ensure the perfect fit for your project.
7. Affordable and Efficient: With BaseCore™, you save time, money, and materials. Our products are designed for easy installation, reducing costs without sacrificing quality or performance.
Frequently Asked Questions (FAQ)
As you consider using BaseCore™ geocell panels for your gravel driveway or other ground stabilization projects, you may have some questions. Below are some of the most frequently asked questions to help you better understand how our geocell products can benefit your project.
Q: What is BaseCore™ Geocell and how does it work?
A: BaseCore™ geocell is a high-density polyethylene (HDPE) ground stabilization system designed to reinforce and stabilize soil, gravel, and other aggregates. The geocell panels are formed into a honeycomb structure that spreads out weight and prevents soil erosion, shifting, and ruts. This provides a stable foundation for projects like driveways, pathways, parking lots, and more.
Q: Is BaseCore™ geocell suitable for DIY installation?
A: Yes! BaseCore™ geocell panels are designed for easy installation, making them suitable for both DIY enthusiasts and professional contractors. The panels collapse for transport and can be expanded and installed without the need for heavy machinery or specialized tools.
Q: What types of infill materials can be used with BaseCore™ geocell?
A: BaseCore™ geocell is compatible with a variety of infill materials, including gravel, crushed stone, crushed asphalt, concrete, and even soil for vegetative growth. The flexibility in infill options allows you to customize your project based on your needs and budget.
Q: How long will a gravel driveway with BaseCore™ geocell last?
A: When properly installed, a gravel driveway reinforced with BaseCore™ geocell can last for decades. The geocell panels are made from military-grade HDPE, which is resistant to extreme weather, chemicals, and UV exposure. This means less maintenance and a longer lifespan compared to traditional gravel driveways.
Q: Does BaseCore™ require any special maintenance after installation?
A: One of the key benefits of BaseCore™ geocell is its low maintenance. Unlike traditional gravel driveways that may require frequent re-graveling or repair due to shifting, BaseCore™ panels keep the gravel in place, significantly reducing maintenance needs. Periodic inspection and simple adjustments (if needed) are generally all that’s required.
Q: Can BaseCore™ geocell handle heavy traffic?
A: Absolutely! BaseCore™ geocell is designed to withstand heavy traffic loads, making it ideal for driveways, roadways, and parking areas. The BaseCore™ HD option is available for projects requiring even greater load-bearing capacity, such as commercial or industrial applications.
Get Started with BaseCore™ Geocell Products Today!
Ready to upgrade your gravel driveway with a foundation that lasts? BaseCore™ geocell panels are your ideal solution. Our durable, military-grade geocell products are engineered to withstand even the toughest conditions, offering unmatched stability, reducing long-term maintenance costs, and giving you peace of mind.
Contact BaseCore™ for a Free Quote
Don’t wait—get started on your gravel driveway project today with BaseCore™. Our experienced team is ready to assist you with quick, reliable product estimates and expert advice tailored to your specific needs. We offer a fast turnaround, providing comprehensive quotes for geocell panels, clips, and caps within hours.
Visit our Contact Page to get started. Simply fill out the form with your name, email, phone number, and project details, and one of our engineers will be in touch shortly. You can also call us directly at (888) 511-1553 for immediate assistance.